
How to Panel a Wall

Project overview
Modern wall panels
Wall panelling has two core styles and a lot of variation. Modern whole-wall panels are similar to classic Georgian styles. Think geometric shapes with fine ridges and clean lines framing the wall. This style works well across the whole span of a wall or to frame a specific element of your home, like around a headboard or as a backdrop to a dining table.
To get you started, here’s some inspiration.
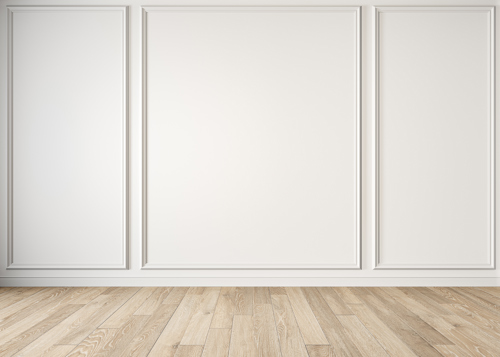
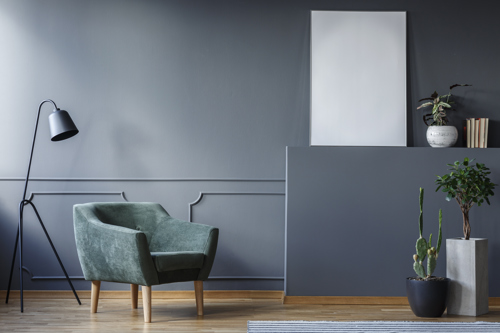
Simple moulding with white space
This style is perfect if you love minimalism. It’s a timeless and unobtrusive style that’s easy to maintain and make.
It can act as a dramatic framing for your favourite artwork and lends itself well to an experimental colour scheme. Try painting the space between mouldings for a contrasting and dramatic look.
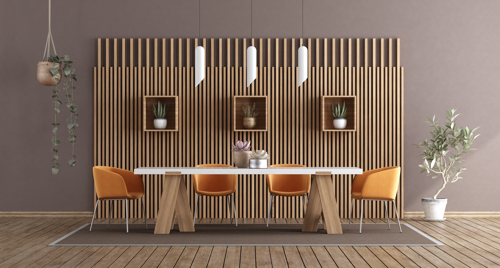
Floor to ceiling natural wood
Floor to ceiling battens are having a moment. Dramatic and striking in a warm way, they add depth and texture and look particularly good when left as natural wood with a stain or varnish.
Use it as a backdrop to frame your dining table, bed, TV or sofa
Classic squares
Inspired by traditional styles, these symmetrical geometric shapes are so visually satisfying to look at.
Taking a little bit more time to make, it’s still a simple pattern and looks striking when painted in a uniform colour.

Grooved panelling
Similar to the above style, this type of panelling is a modern twist on a traditional style.
This one is a little harder to create because of the grooved look, but it’s still straightforward. Leave in a natural style, stain or paint - either way, this style is playful and fun.

Half wall panelling ideas
Half-wall height panels (sometimes known as wainscotting) are fantastic if you want to create a dramatic and contrasting look. Vertical, boxy or slatted styles add texture and are great if you don’t want to commit to the style completely.
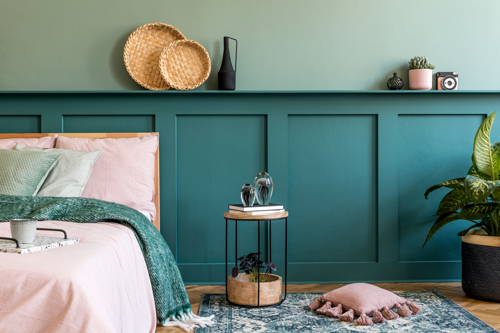
Practical but stylish
This half-height panelling is slightly chunkier than other versions because of the handy practical ledge. It’s a brilliant way to introduce stylish functionality into your home and is particularly useful in bedrooms.
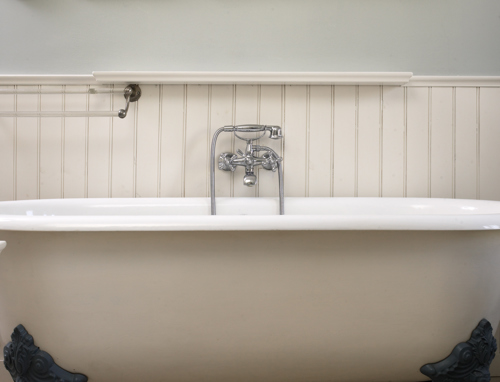
Retro wainscotting
You can easily update this look with a flash of colour. Choose the same colour in a different shade to the rest of the wall for a modern take on a traditional style.
Half-height Georgian style
A classic period style, this works particularly well around bay windows.
How to panel a wall
For this job, you need MDF, sandpaper, a spirit level, paint (or stain or varnish), tape measure and a pencil.
1. Plan your design
Grab a pencil and paper and sketch out the design you want. The dimensions don’t have to be accurate; it’s just to give you an idea of what you’re working towards.
You also need to decide how thick (aka deep) you want your MDF to be. Your choice is generally 6mm, 9mm, 12mm, 18mm and 25mm. The kind of style you want might make this an easy decision. For example, traditional Georgian styles are often thinner, whereas modern styles are much chunkier.
Finally, decide how wide you want the MDF to be.
2. Get your measurements
You now need to measure your wall to figure out exactly how much MDF you need.
Measure the width of your wall. Say it’s 500cm wide.
Decide how far apart you want your vertical battens to be spaced. You might have to tinker with this until they look even, but sketching it out on the wall with a spirit level and measuring tape is a handy way to visualise your design. Remember, you need two battens at the far left and right edges of your wall too. For this example, we need six vertical boards.
Multiply the number of vertical battens by the total width you want each batten to be. In our case, this would be 6 x 10cm = 60cm.
Then, subtract the previous figure from the width of your wall. So 500cm - 60cm = 440cm. This is the total amount of space you have to play with for your panels.
Take that figure (440cm) and divide it by the number of gaps between vertical battens. We have six battens to create five panels. 440cm / 5 = 88cm. This means your completed panels will be 88cm wide.
Next, decide how tall you want each batten to be. This might be the height or half-height of your room; we want our batten to be 200cm tall.
Finally, work out how many horizontal battens you need to sit across the top of the vertical ones. To work this out, divide the width of the room by the height of a panel. 500cm / 200cm = 2.5. This tells us we need two horizontal boards at 200cm and one at 100cm.
So our cuttings are:
1 horizontal 100cm x 10cm batten
2 horizontal 200cm x 10cm battens
6 vertical 200cm x 10cm battens
You can take these figures to your nearest DIY shops and get the MDF cut to size for you.
3. Sand your wall
Sand the area that you’re panelling down, so it’s nice and smooth. That ensures the MDF lays flat.
Wipe down the dust and let it dry.
4. Attach the panels
The quickest way to attach the MDF to the wall is with adhesive glue. If you choose this option, apply the adhesive to the MDF, 10cm from the edges and no more than 30cm between blobs.
Position the MDF against the wall and firmly push it into place. This spreads the adhesive evenly, helping it better stick.
Start with the outline of your shape at the bottom, top, left and right of the wall. Then add the remaining vertical panels before finishing with the horizontal panels.
5. Seal the gaps
Don’t worry if you have any gaps or cracks; you can easily fill these with decorator’s caulk. Do this at every joint, too, for a seamless look.
Wait for the filler to dry before sanding.
6. Paint the MDF
For the finishing touch, paint your MDF. Our range of wood care paints, varnishes and stains are perfect for this job and super easy to use.
If you’re painting the wall a different colour, use decorator’s tape to protect the edges where you don’t want to get paint.
And that’s it! If you’ve opted to stain or varnish the wood, you’ll need a top-up coat every year or so, but otherwise, job done.
We recommend…
